
Got a skirt that could use a cuter hemline? Scallops.
Want a collar that stands out? Scallops.
Pillowcases putting you to sleep? Scallops.
Today I'm all about scalloped edges. This super-sweet hem style has an awesome retro vibe that can be dressed up or down. But getting crisp scallops as a seamstress can seam (haha get it??) a daunting task.
I'm here to tell you all that scallops are actually really easy, and with a couple tips, you'll be ready to sew that shit on 'errythang.
Let's get started. You'll need:
Fabric of your choice (I'm using old pillowcases with a cute pattern!)
Fusible interfacing in a medium weight
Coordinating thread
Ruler
Pencil (something soft, 2b or higher)
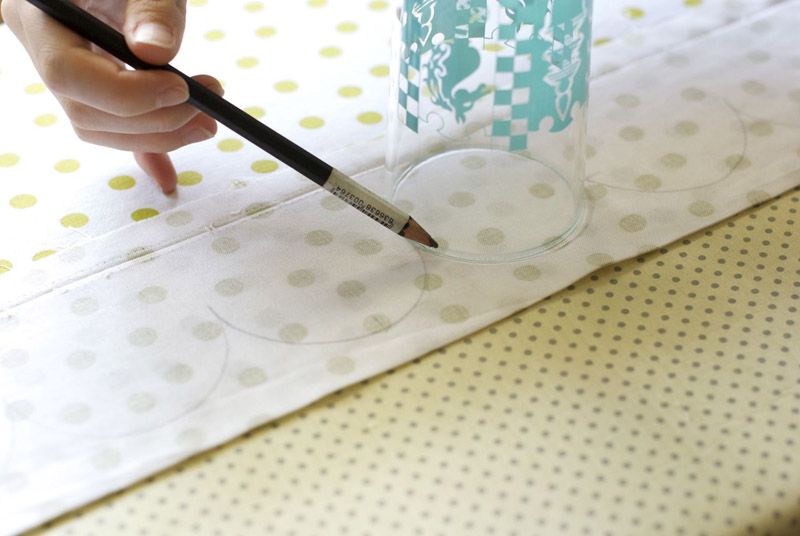
A template of the diameter of each scallop (I used a drinking glass).
Sewing Machine
Good sharp shears
optional: needle and thread for hand finishing.
optional: trim (ribbon etc.)
Fabric of your choice (I'm using old pillowcases with a cute pattern!)
Fusible interfacing in a medium weight
Coordinating thread
Ruler
Pencil (something soft, 2b or higher)
A template of the diameter of each scallop (I used a drinking glass).
Sewing Machine
Good sharp shears
optional: needle and thread for hand finishing.
optional: trim (ribbon etc.)
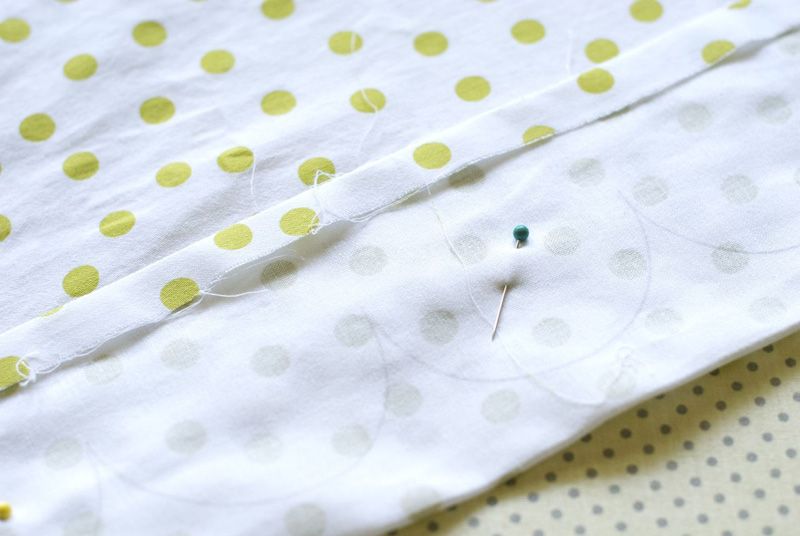
1. Iron your hem inside out (good faces in) about 1/2" longer than your desired finished length. This will create the front and back of the scallops. Turn in (good face out) 1/2" of the raw end. This will end up sewn into the hem.

2. Draw on your scallops onto the inside of the hem, using your template, with the lowermost edge 1/2" above the ironed edge. You can keep the scallops consistent by marking the centre of your template at even intervals, or eyeball it if you feel comfortable. The inner points where each scallop meets must sit at least 1/2" under where the hem ends on the inside, so that the turned in fabric will lay flat.
3. Cut a strip of fusible interfacing as long as the edge being hemmed, and the width of the total hem, less 1/8" to keep the sewn edge crisp. Iron this strip onto the bad side of the outside fabric. So, the interfacing isn't on the hem that has been ironed, but rather onto the back of the "face" of the finished piece. This will help keep the scallops very crisp looking.

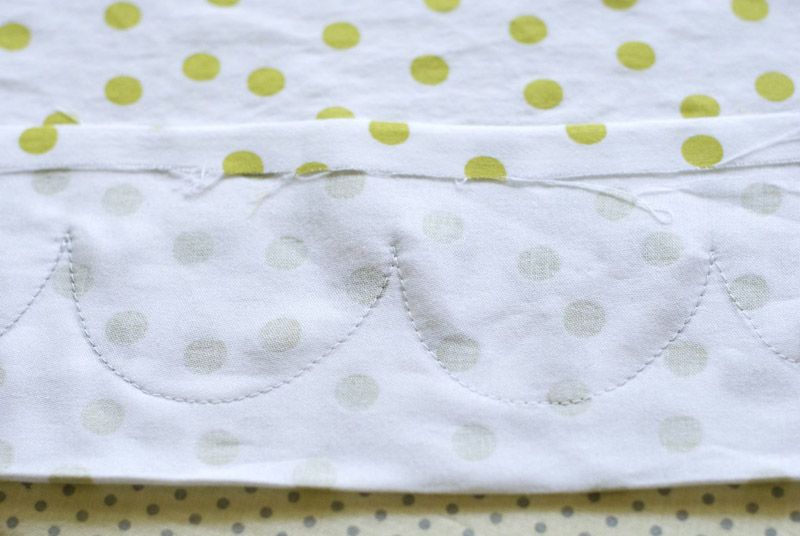
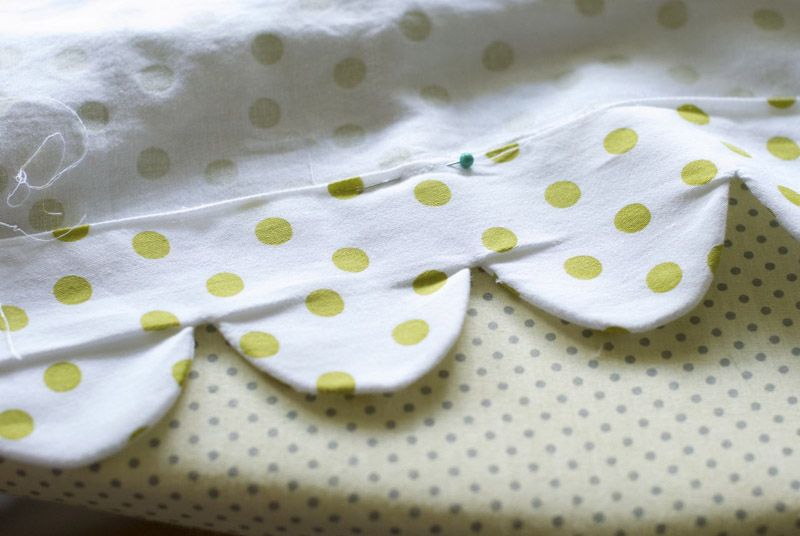
4. Pin sporadically through the scallops. Sew the scallops using the curves drawn inside the hem earlier as your guide. Take it slow, and stay on your line. I like to do a little back stitch (2-3 stitches) on either side of those innermost points. This reinforces the stitches, and adds some stability to an area that will be clipped very close to stitching.
5. Trim the allowance on top of the scallops (the edge that you folded over and ironed to decide the total length. This is the old hem, cut it away to reveal the scallops! To avoid having to clip my scallops, I like to trim VERY close to my stitching line ( between 1/16-1/8"). Be careful, it's easy to snip the stitching! In the innermost corners, carefully clip through the centre up towards your stitching line. Get as close as you can, but don't cut the stitching!
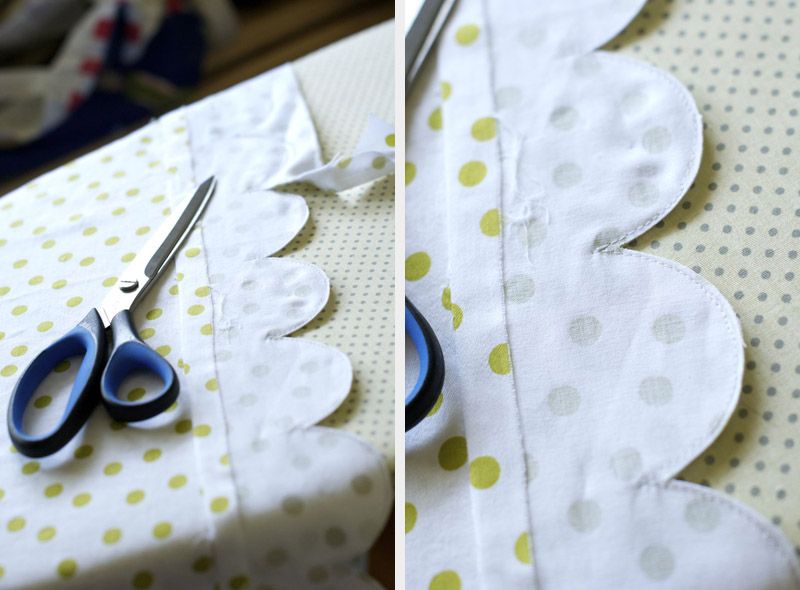
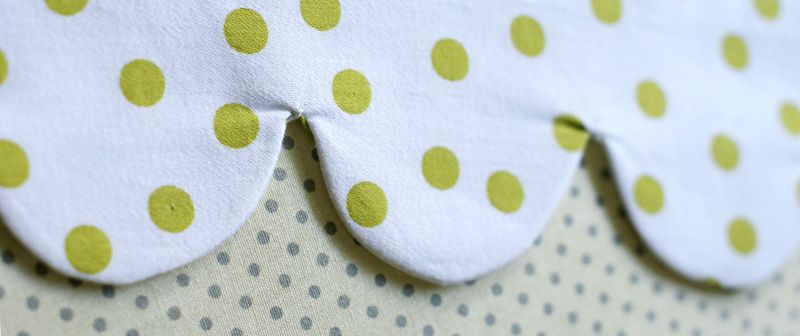
6. Turn the scallops right side out, revealing the good side of the fabric. Carefully shape them with your fingers, checking for any holes from trimming. Press the scallops like your life depends on it. If you notice puckering at the innermost points when your scallops are turned inside out, it's because the stitched line extends too far down. If you backstiched these points like a paranoid maniac like me, you can snip away the first stitch of thread you see in the point. Repress. Better.
 |
| See how badly puckered the points are? Snipping just one thread made them sit much flatter. See below! |
7. Optional: You can topstitch the edge of the scallops to encourage them to sit as flat as possible.
8. Secure the top edge of the hem. You can use machine stitching, but this leaves a stitching line that is visible on the face of the project. This can always be covered with trim, of course! Otherwise, sew by hand using a pick-stitch or other hidden stitch.
8. Secure the top edge of the hem. You can use machine stitching, but this leaves a stitching line that is visible on the face of the project. This can always be covered with trim, of course! Otherwise, sew by hand using a pick-stitch or other hidden stitch.
**note: as scallops are a hem, always sew scallops on edges that are already perfectly sized. You won't be able to adjust the width once the scallops are done, so double check your measurements before you get started**
There you have it, folks. Those steps may look dense, but that's just because I've included some advice I wish I'd had the first time I sewed scallops! The images illustrate what an easy project it is to tackle. So don't be intimidated, get sewing!
If you make any scallop projects, please comment with a link! I'd love to see what ordinary items you spruce up with scallops, from pants to place mats!
--Erin

Wow, you make this look so easy! Maybe I'll give it a go sometime.
ReplyDeleteBecky
xx
http://www.beckybedbug.com
Definitely do, Becky! It's a project I wish I hadn't been so intimidated about trying when I first learned how to sew. It's all a mind over matter kinda deal, I think!
Delete--Erin
why are scallops so addicting?
ReplyDeleteI think it has something to do with how unrelentingly adorable they are!
Delete--Erin
This is SUCH and cute and simple DIY. I've got SO many things I could do this to....... my mind is racing with all of them right now. :)
ReplyDeleteThanks!
Trish
www.jellybonesblog.blogspot.com
I'd love to see what you come up with!
Delete--Erin
Thank you so much for this tutorial! Like most people, I have a big place in my heart for scallops :) I made some scalloped shorts last summer but left the edges raw because I didn't know how the heck I'd finish them. I need to try this!
ReplyDeleteI'm not sure I could trust anyone who DIDN'T like scallops, I mean, what's not to like?! I hope this tutorial helps you build stable clean scallops on your future projects! A part of me wants to re-hem my tablecloth, but I know that's basically insane.
Delete--Erin